Tuesday, July 12, 2011

9 years

The key to a man's heart: bacon & bourbon

Today marks our 9 year anniversary together! That is my boyfriend and I ;-) Crazy huh?! Were not really into gift giving but we do always try to go out to a nice dinner somewhere and maybe give a creative little gift. This year I decided to surprise him with this dessert I saw in the latest issue of Food & Wine Magazine. He's not really a sweets person yet he complains I make things for everyone else and not him. Seriously... men?! lol.

I love the irony of the card next to the bacon brownies

I instantly wanted to make these Bacon Bourbon Brownies when I saw them in the magazine. I love the sweet and salty combo and he loves bacon and alcohol just brings it all together. I find homemade brownies hit or miss for me. I've made a batch before that came out rock hard and others that were just okay. I'm actually a fan of the box mix becuase they always turn out right and taste damn good! So anyways... These were actually really good but just a few things: After I baked these, I don't know if I over baked them a few minutes or what, but the outside ones were a little dry. These are definitely a dark chocolate kind of brownie and it needed a little something sweet (maybe that's just me). I whipped up some Maple Bourbon Cream Cheese Frosting to top it off with which married perfectly together with the brownie. In the end the BF liked them and that's what matters the most. Happy anniversary babe!

Bacon Bourbon Pecan Brownies
From Food & Wine

Ingredients:

1/2 cup pecans

1/2 pound sliced bacon

8 ounces bittersweet chocolate, chopped

2 ounces unsweetened chocolate, chopped

1 stick plus 2 tablespoons unsalted butter

1 cup granulated sugar

1/2 packed cup light brown sugar

3 tablespoons bourbon

4 large eggs

1 teaspoon salt

1/4 cup unsweetened cocoa powder

1 1/2 cups all-purpose flour

Directions:
  1. Preheat the oven to 350°. Line a 9-inch square baking pan with parchment paper, allowing 2 inches of overhang on 2 opposite sides. Spray the paper with vegetable spray. Spread the pecans in a pie plate and toast for about 8 minutes, until fragrant. Let cool, then coarsely chop the nuts.
  2. In a skillet, cook the bacon over moderate heat, turning once, until crisp, 6 minutes. Drain on paper towels and let cool; reserve 3 tablespoons of the fat. Finely chop the bacon.
  3. In a saucepan, combine both chocolates with the butter and stir over very low heat, until melted; scrape into a large bowl. Using a handheld electric mixer, beat in both sugars with the reserved 3 tablespoons of bacon fat. Beat in the bourbon. Add the eggs and salt and beat until smooth. Sift the cocoa and flour into the bowl and beat until blended.
  4. Scrape the batter into the prepared pan and sprinkle the bacon and pecans on top. Bake for about 50 minutes, until the brownies are set around the edges but slightly wobbly in the center; a toothpick inserted into the center should have some batter clinging to it. Transfer the pan to a rack and let the brownies cool completely. Lift the brownies out of the pan using the parchment paper. Cut into squares or rectangles and serve.


Maple Bourbon Cream Cheese Frosting

Ingredients:

1 stick of butter (room temp)

1/2 block of cream cheese (4oz.) (room temp)

Powdered Sugar

2 tsp. bourbon

1 tsp. maple extract

Directions:

1. Mix together butter and cream cheese in your stand mixer until combined.
2. Add about a cup of powdered sugar and the bourbon and maple extract and continue to mix.
3. Add a little more powdered sugar until it is the consistency you desire. (I never measure my powdered sugar).
4. Put in a ziploc bag, cut off the corner of the bag and drizzle onto the cooled brownies.

Monday, July 4, 2011

Happy 4th of July

This is one of the first years we aren't hosting a 4th of July BBQ and I must say it's been quite a relaxing day! We are headed to a friends house to BBQ later today and I always have to whip up something to bring. I picked up fresh blueberries, strawberries and rhubarb at the store last night and concocted this cake with the inspiration of Martha Stewart.

I used Martha's Strawberry Cream Cake recipe but instead of just plain strawberries to layer the cake with, I made a strawberry-rhubarb compote between the layers. Garnished it with fresh blueberries. Hopefully it won't be a pain to transport to the BBQ tonight... Happy 4th of July!The cake is made in 3 parts: the cake, the whipped cream and the compote. This recipe makes 2 8 inch layer cakes, if you want a 3 layer like mine, make and additional half of the cake recipe. Once the cakes and compote are cool you can layer away. I did have to torte the tops of the cakes to make them flat before layering. Compote and whipped cream can be made the day before. What I love about this cake is that rustic, simple look. Enjoy!


Strawberry-Rhubarb Cream Cake
Adapted from Martha Stewart

Cake Ingredients:
  • 1/2 cup (1 stick) unsalted butter, room temperature, plus more for pan
  • 1 1/2 cups all-purpose flour (spooned and leveled), plus more for pan
  • 2 teaspoons baking powder
  • 1/2 teaspoon salt
  • 1/2 cup sugar
  • 2 large eggs plus 2 large egg yolks
  • 1 tsp vanilla bean paste
  • 1/2 tsp orange extract
  • 1/2 tsp lemon extract
  • 1/2 cup whole milk
Cake Directions:
  1. Preheat oven to 350 degrees. Butter bottoms of 2 8-inch round cake pans, and line with parchment paper. Butter and flour paper and sides. In a medium bowl, whisk together flour, baking powder, and salt; set aside.

  2. Using an electric mixer on high speed, beat butter and 1/2 cup sugar in a large bowl until light and fluffy. Add eggs and yolks, one at a time, beating well after each addition. Beat in vanilla bean, orange and lemon extract. With mixer on low, alternately add flour mixture in 3 parts and milk in 2, beginning and ending with flour mixture; mix just until combined. Spread batter in prepared pans. (I like to use an ice cream scoop to divide the batter evenly between the pans. All you have to do is count how many scoops you do in each pan ;-)

  3. Bake until a toothpick inserted in center of cake comes out clean, about 18 - 20 minutes. Cool in pan 10 minutes; invert onto a wire rack to cool completely.


Whipped Cream Ingredients:
  • 1 teaspoon unflavored gelatin (from a 1/4-ounce envelope)
  • 1 1/2 cups heavy cream
  • 1/4 cup sugar
  • 1 tsp vanilla bean paste (optional)
Cream Directions:
  1. Place 2 tablespoons cold water in a small saucepan, and sprinkle with gelatin; let soften 5 minutes. Place saucepan over very low heat, and stir until gelatin is dissolved. Remove from heat; let cool.
  2. Using an electric mixer, beat cream and remaining 1/4 cup sugar in a large bowl until very soft peaks form. Continue to beat, and gradually add gelatin mixture; beat until soft peaks form. Add vanilla bean paste and mix for a few more seconds.

Strawberry-Rhubarb Compote
From Martha Stewart

Ingredients:
  • 10 ounces (2 cups) fresh strawberries, rinsed, hulled, and chopped
  • 1/4 cup plus 1/3 cup sugar
  • 1 tablespoon fresh lemon juice
  • 10 ounces trimmed rhubarb, cut into 1/4-inch pieces (about 2 3/4 cups or 2 large stalks)
  • 2 tablespoons water
Directions:
  1. Stir strawberries, 1/4 cup sugar, and lemon juice in a small nonreactive pan; bring to a simmer over medium heat. Cook, stirring often, until softened, about 3 minutes. Remove strawberries with slotted spoon; place in a bowl and let cool. Set aside pan with strawberry liquid.
  2. Meanwhile, in another small pan over medium-low heat, combine rhubarb, remaining 1/3 cup sugar, and the water. Simmer gently, stirring often, until sugar is dissolved and rhubarb is almost tender, about 6 minutes. Using a slotted spoon, transfer rhubarb to bowl with strawberries. Add strawberry liquid to pan.
  3. Raise heat to medium and simmer until thickened and reduced to 1/2 cup, about 10 minutes. Let cool. Stir into strawberry-rhubarb mixture.

Saturday, July 2, 2011

Semi-Homemade Mini Lemon Tarts

I pulled a Sandra Lee last weekend and made "semi-homemade" mini lemon tarts garnished with fresh berries for the wedding shower. The lemon curd I had prepared a few weeks before hand for the wedding cake I did recently (which was actually for the bride to be's now sister in law ;-). The lemon curd froze really well and did not loose any of it's thickness when defrosted. This is a great recipe for summer and mini desserts are all the rage right now.

How to make "Semi-Homemade" Mini Lemon Tarts....
1. Prepare lemon curd (this can be done in advance and like I said
it freezes well. When you need to defrost it, put it in the refrigerator 24hrs before you need it.)
2. Prepare the mini shells with pre-made pie crust
3. Pipe the lemon curd in the shells and garnish to your liking (these can be prepared the night before and kept in the fridge).

Lemon Curd By The Joy of Baking

3 large eggs

3/4 cup (150 grams) granulated white sugar

1/3 cup (80 ml) fresh lemon juice (2-3 lemons) (do not use the bottled lemon juice)

4 tablespoons (56 grams) unsalted butter at room temperature

1 tablespoon (4 grams) finely shredded lemon zest

In a stainless steel bowl placed over a saucepan of simmering water, whisktogether the eggs, sugar, and lemon juice until blended. Cook, stirring constantly (to prevent it from curdling), until the mixture becomes thick (like sour cream or a hollandaise sauce) (160 degrees F or 71 degrees C). This will take approximately 10 minutes. Remove from heat and immediately pour through a fine strainer to remove any lumps. Cut the butter into small pieces and whisk into the mixture until the butter has melted. Add the lemon zest and let cool. The lemon curd will continue to thicken as it cools. Cover immediately (so a skin doesn't form) and refrigerate for up to a week. Makes 1 1/2 cups


Mini Pie Shells

You can find pre-made pie dough in the refrigerator section at your grocery store. I found mine near the cookie dough. Unroll the dough on your counter and using at least a 3in circle cookie cutter cut out circles. I around 8 circles in one dough. Place them each in a muffin tin cup. You want to make some sort of well for the curd to sit in. Don't forget to pierce the bottom of the dough or it will balloon up! I baked mine on 400 degrees for 5-6 minutes (this may vary according to the directions on the box). Let them cool. Now you're ready to fill with the curd!

*I tired using the extra dough by putting all the scraps together and re-rolling it out, cutting out the circles, and everything... but when it baked it shunk up and did not make a cute little bowl/well like the others. Still tasted good though ;-)


Here is a funny pic my friend sent me of her family's dog rocking a "sombrero cookie" as her dad called them when he first saw the tarts LOL...

Tuesday, June 28, 2011

Oreo Pops > Cake Pops


I have come to the conclusion I like Oreo pops much better than cake pops. Maybe it's because they're easier to make (less prep to do)? And maybe because I'm just not really down with the soggy texture of a cake pop when I bite into it. Not trying to knock the cake pops or anything - I still do love Bakerella! ;-)


Here are some Oreo pops I make for one of my best friend's wedding shower this weekend. The Oreo pops were just one of many sweets I made for the occasion.


When making them I switched it up with Golden Oreos and Peanut Butter Chocolate Oreos. Double stuff is the way to go with these! So much easier inserting the stick with out breaking it. But.... if you have to have a regular size Oreo, I found that if you insert the stick carefully, put a little of the chocolate around the base of the cookie and stick and chill it for a few minutes. It kinda glues it in place. Now your ready to dip the whole thing :)


Here's a few more of the sweet's I made for my friend's shower:

~Homemade marshmallows dipped in chocolate w/ graham crackers or toasted coconut
~Semi-homemade lemon tarts with fresh berries (I may put the recipe up later)
~ Coconut macaroons
~Key lime pie cupcakes
~Banana, nutella and coconut cupcakes


Nom Nom Nom....

Wednesday, June 15, 2011

Vineyard Wedding


This past weekend I had the honor of making the wedding cake for one of my best friend's brother's wedding. When it came to the cake, the bride was very laid back and open to all ideas when we were discussing decor. The colors of the wedding were purple and green and It was going to be held at a local winery. So, when I think of a vineyard, I think rustic.

One of the farms near the winery

Entrance to the winery

With all that in mind, this is the cake I came up with. It's quite simple but elegant at the same time. Thank you to Tim, the bride's friend who supplied all the flowers for the wedding and had extra for the cake. I put hydrangea and roses.

I love this pic of the cake on the wine barrel

...and a close up shot of the cake

I love the rustic look. I also love how much less stress it is to put together this kind of cake. The stress came in when I got the weather report for the weekend: 90 degrees with humidity. Did I mention it was an outdoor wedding? We had to keep the cake inside until the cake cutting. Since I was attending the wedding as well it was no problem to help set up everything right before hand. I forgot to mention, the cake was a lemon cake with lemon curd filling and white chocolate swiss meringue buttercream. Yummy! For the guests we set up a cupcake table with assorted cupcakes.

To go with the rustic look, I decided to display the cupcakes on different stands and cake plates. This gave it depth and added to the rustic feel of the wedding.

The flavors were lemon raspberry, chocolate salted caramel, and carrot cake.

It was a beautiful wedding! Congrats Jon & Angela! Thanks for letting me be apart of your special day :)

Wednesday, June 8, 2011

Salted Caramel


Preparing ingredients for a wedding cake and cupcakes this weekend. One of the flavors the bride and groom chose was chocolate and salted caramel. I'm a bit obsessed with salted caramel, even though some may say "it was so last year" but I don't care! Something about that sweet and salty combo.... It's great for fillings (which I will be doing for the cupcakes this weekend); a topping on chocolate ice cream; or just eating by the spoonful ;-) Here is the recipe which is pretty easy to follow. The site I got the recipe from has good pics for those first time caramel sauce makers (I will admit, I burnt my caramel sauce the first time I tried to make it).


Salted Caramel Sauce
Modified from Simply Recipes

Ingredients

  • 1 cup of sugar
  • 6 Tbsp butter
  • 1/2 cup heavy whipping cream
  • Kosher Salt

Method

1 First, before you begin, make sure you have everything ready to go - the cream and the butter next to the pan, ready to put in. Making caramel is a fast process that cannot wait for hunting around for ingredients. If you don't work fast, the sugar will burn. Safety first - make sure there are no children under foot and you may want to wear oven mitts; the caramelized sugar will be much hotter than boiling water.

2 Heat sugar on moderately high heat in a heavy-bottomed 2-quart or 3-quart saucepan. As the sugar begins to melt, stir vigorously with a whisk or wooden spoon. As soon as the sugar comes to a boil, stop stirring. You can swirl the pan a bit if you want, from this point on. Note that this recipe works best if you are using a thick-bottomed pan. If you find that you end up burning some of the sugar before the rest of it is melted, the next time you attempt it, add a half cup of water to the sugar at the beginning of the process, this will help the sugar to cook more evenly, though it will take longer as the water will need to evaporate before the sugar will caramelize.

3 As soon as all of the sugar crystals have melted (the liquid sugar should be dark amber in color), immediately add the butter to the pan. Whisk until the butter has melted.

4 Once the butter has melted, take the pan off the heat. Count to three, then slowly add the cream to the pan and continue to whisk to incorporate. Note than when you add the butter and the cream, the mixture will foam up considerably. This is why you must use a pan that is at least 2-quarts (preferably 3-quarts) big.

5 Whisk until caramel sauce is smooth. Add kosher salt to taste. Let cool in the pan for a couple minutes, then pour into a glass mason jar and let sit to cool to room temperature. (Sauce will thicken as it cools). Store in the refrigerator for up to 2 weeks. Warm before serving.

Makes a little over one cup of sauce.

Thursday, May 26, 2011

Ashley's Shower: Part II

Here are more details from the baby shower this past weekend. In the previous post I put all the food. Here in this post, is the decor, activities and games that we did for the shower.

Banner created by Erika. She hung it on twine to give it a rustic, natural feel.


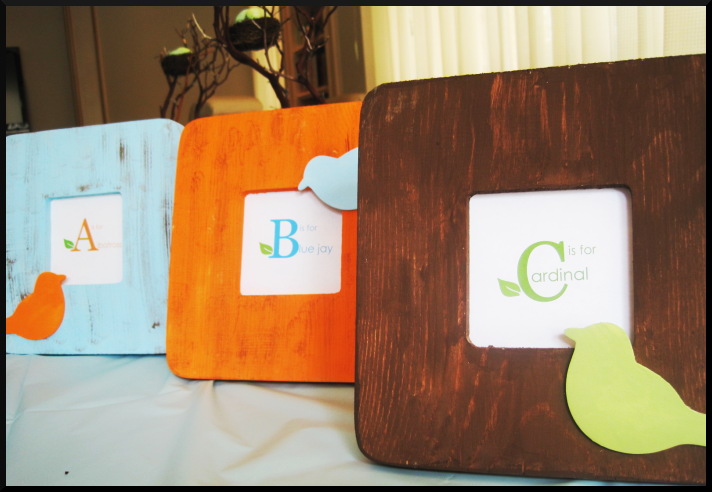
Plain wooden frames I painted for decor. I did a bird ABC theme. You know it's hard to find birds that start with A! Albatross was the only decent bird I could find lol. These can be incorporated into the baby's room if they want :)


Bird house I painted. The tree was another theme of the shower inspired by the invitation.


Center pieces created by Heather using mason jars, rocks, moss, manazita branches, nests and eggs.


Bird themed library using books from the actual library and left over branches.


On of the activities was for each guest to leave a finger print on a tree of life canvas so the baby will know what great friends and family he will be supported by. The canvas was designed and painted by Erika.

View of the canvas which will be hung up in the baby's nursery.


Baby shower games. A shower isn't complete without cheesey games. We did the "mystery baby food tasting" and of course the candy bar diaper game.


And for our last activity we had guest decorate all different sized onesies for the baby to grow into.

Here is my onesie I created... of course!

It was such a great shower. The first one that I've actually helped to plan. We got such nice compliments from the guests and of course the mommy to be LOVED it too :) Congrats to Ashley, the momma to be! And thanks to Erika and Heather, we made a great team and it was a success ;-)

Now, as Jay-Z says.... on to the next one! June is booked for a friends wedding and a friend's bridal shower.

Tuesday, May 24, 2011

Ashley's Baby Shower: Part I

This weekend I helped host my friend Ashley's baby shower! The two other girls (Erika and Heather) who helped put the shower together, have design experience and I love putting together these kind of events, so we made a great team :) We have been planning for the past few months now and it all came together this past Sunday. The inspiration was drawn from the beautiful invitation our friend Erika designed:I love it! How cute is the bird family?! The theme for the shower was birds with the color palate of green, blue and orange with hints of brown and yellow here and there. Our friend Ashley does eco-friendly fashion so we wanted it to be very natural and "naturey" as well. In this first post, I will post all the food from the shower.


Our menu and the frame I painted to match the shower theme.


Close up of the menu. We had sweet and savory items.


Cucumber and radish open faced sandwiches made by Erika. I also made the plate stand. I will post how I did that later :)


Desserts included: lemon blueberry cupcakes, chocolate orange cupcakes, a small lemon blue berry cake, bird's nest treats, coconut macaroons and fruit salad served in sugar cones.


So many pics, so little space... click to see these larger :)


6 inch mini lemon blueberry cake with vanilla swiss meringue buttercream for the mommy to be. Notice the birds match the birds on the invite :)


Everyone loves these homemade coconut macaroons! They have become a staple any time I do an event for my friends lately. They're so easy to make too!


For favors we ordered swirl lollipops and personalized them with our own sticker to match the shower as well a simple bow.

So you can't eat it, but a shower is not complete these days without a diaper cake! I like to keep mine simple, so I made a basket to hold a majority of the contents. Products included all natural baby products from my friend's website Mom To Mom Health!


Gotta wash it all down with personalized water bottles! Label designed by our friend Heather.

Stay tuned for the next post for part II.

Wednesday, May 18, 2011

strawberry shortcake


Whipped up some easy strawberry shortcakes the other day for dessert. Still waiting for the strawberries to come in to season (definitely had to sugar them up a bit), but the cake part was super easy and tasted so good! Especially when served right out of the oven ;-) I added a touch of lemon zest to the biscuits and vanilla bean to the homemade whipped cream. The following recipe that I used is from Baking Bites. I cut it in half so I'd have just enough and not many leftovers.


Strawberry Buttermilk Shortcakes
Recipe adapted from Baking Bites
Makes just about 5 servings (depending on how big or small you prepare the biscuits)


1 cups all purpose flour

1/4 cup sugar

1/2 tbsp baking powder

1/8 tsp salt

3 1/2 tbls butter, chilled and cut into pieces

3/8 cup buttermilk (that's half of 3/4 cup ;-)

1/2 tsp vanilla extract
Fresh lemon zest (about a half lemon)
Fresh, ripe strawberries

Homemade whipped cream

1. Preheat oven to 400F.

2. In a large bowl, combine flour, sugar, baking powder and salt.

3. Rub in butter with your finger tips until mixture resembles coarse crumbs (or pulse a few times in a food processor).

4. Stir in buttermilk, vanilla extract and lemon zest until the dough comes together. Add an additional tablespoon of buttermilk if the dough is slightly dry.

5. Drop by 1/4 cups (use a measuring cup) onto a parchment-lined baking sheet. Or, I gently spread out the dough to around a 1/2 inch thickness and cut out the short cakes with a heart shaped cookie cutter (or use a small biscuit cutter). I got about 10 heart shaped biscuits with the size cutter I used.

6. Bake for 15 minutes, or until golden.

I like to serve them immediately out of the oven. Slice in half, put in fresh strawberries, homemade whipped cream, and enjoy ;-) I'm definitely ready for summer and strawberry season! ~Cara Lee

Monday, May 16, 2011

may = baby showers

I'm just about finished my spring semester and looking forward to blogging once again this summer! I've been able to bake a bit more, a few cupcakes here and there for friends, but I'm itching to make a cake. It's been awhile since I've done one!

In the mean time I have 3 baby showers this month! One was this weekend that I had to miss :( But I sent over some cupcakes of course ;-)

Red velvet with vanilla bean cream cheese frosting
and homemade cupcake toppers


Next weekend I'm helping host my girlfriend Ashley's baby shower. I'm sooo excited! Here's a little sneak peek at the invitation our friend designed. The theme of the whole shower is inspired by her wonderful art work!

Beautiful invite designed by our friend Erika

We have been preparing for Ashley's baby shower for a few months now. I can't wait to unveil all our hard work next weekend! Until then...