Sunday, January 9, 2011

Tinkerbell Birthday

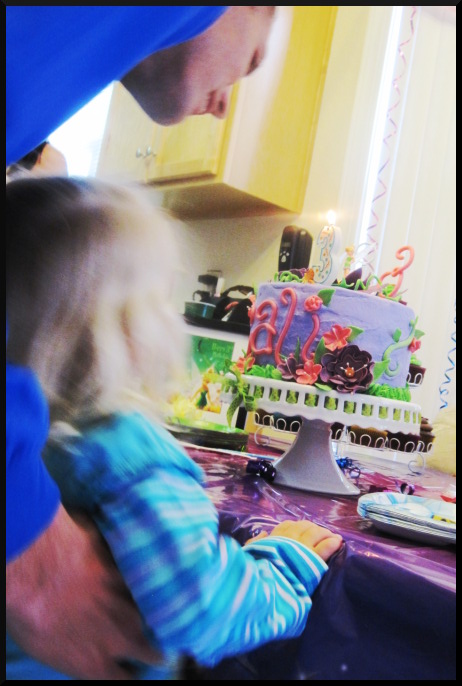
It has kind of become a tradition to make my neice's birthday cakes. Last year I did a Sesame Street cake with matching character cupcakes (which are still one of my top favorites I have done). This year for her 3rd birthday she wanted Tinkerbell. Off the bat, the is no way I was going to attempt to sculpt a Tinkerbell. I found a set of Tinkerbell and her fairy friends which I used to decorate with. Everything else was made by hang with fondant - flowers, vines.

The decor was pretty easy. Whenever I make a cake, I make the decor a few days before to dry out. For this cake it was simple flowers, name, number 3 and some vines and grass. I bought a small extruder (which is usually used for clay) to make the name and number. SO much easier than trying to roll it out. For the flowers - I have decided I just don't have patience for beautiful gumpaste flowers. So I use the small blossom cutter and mold as well as make ribbon roses. I also just kinda made up a flower (the big purple one with the white stamens). One day I will learn to make Ron Ben-Israel flowers ;-)

For the big flower on top I actually used the wilton leaf cutter for both the petals and the leaves. I gently pressed them in a flower veiner to give them some life like detail then brushed them with pearl dust. To form the flower I just put yellow royal icing in the middle and pushed the petals in to form the flower. I really loved the way it came out! The curly vines really make it whimsical too.

The cake was a vanilla cake with crusting buttercream. I rarely ever make traditional buttercream. It's really NOT my favorite frosting to use - anyone have a better recipe for that? Preferably one with out shortening? Though the cake looked good, unfortunately it was really dry :( People said it was still fine, but I'm always critical of myself.

I also made chocolate cupcakes. I actually decided to use some of my Naturally Nora mixes I had won. I mixed in Oreos in some and filled others with chocolate ganache or salted caramel. The birthday girl helped me put the sprinkles on (and eat them too! lol). The cupcakes were very moist and yummy :)

Here is the whole spread. I made a little Tinkerbell menu of the flavors of cupcakes and cake for a final touch. Hope you all had a great weekend! ~Cara Lee

~* Happy 3rd Birthday Cali *~

Wednesday, January 5, 2011

My Favorite Cookies

My absolute favorite cookies in the world are oatmeal chocolate chip. Sometimes when I need my fix I get the $1 oatmeal chocolate chip cookies from Potbelly's. Just recently I found these oatmeal chocolate chip cookies with pecans from Elevation Burger which are made with organic eggs and butter. Loved the pecans in there! So I decided to make my own cookies this week. One of my last attempts was not so successful.... but I think I have found my "go to" recipe for now! Oatmeal Chocolate Chip Cookies w/ Coconut and Pecans
Recipe Modified from All Recipes
Makes about 30 mini cookies


Ingredients

1/2 cup butter, softened

3/4 cups packed brown sugar
1 egg

1 teaspoon vanilla extract

3/4 cups all-purpose flour

1/2 teaspoon baking soda

1/4 teaspoon salt

1 1/2 cups quick cooking oats

1/2 cup chocolate chips

1/2 cup chopped walnuts
1/2 cup flaked coconut


Directions

1. Preheat the oven to 350
.
2. In a large bowl, cream together the butter and brown sugar. Beat in egg, then stir in vanilla. In separate bowl combine the flour, baking soda, and salt; stir into the creamed mixture until just blended. Gently mix in the quick oats, pecans, coconut and chocolate chips. (Important not to over mix cookie dough). Drop by heaping spoonfuls onto un-greased baking sheets. (I used a small cookie scoop).

3. Bake for 10-12 minutes in the preheated oven. Allow cookies to cool on baking sheet for 5 minutes before transferring to a wire rack to cool completely. Enjoy with a cold glass of milk :)


For the rest of the week I have to prepare a cake and cupcakes for my BF's neice's birthday. Tinkerbell... so extra girly :) Happy hump day and have a good week! ~Cara Lee

Sunday, January 2, 2011

Homemade Doughnuts

For the New Years party I put together, I was so excited to make homemade baked doughnuts. I ordered a mini doughnut pan from cooking.com a week before and thank goodness it came in the mail just in time. I will admit that a baked doughnut may not be AS satisfying as a fried one from Krispy Kreme... but these were still tasty and can satisfy that doughnut craving. They're also super easy!


Doughnuts
Recipe modified from All Recipes

Ingredients
2 cups all-purpose flour

3/4 cup white sugar
2 teaspoons baking powder
1/4 teaspoon ground nutmeg
1/4 teaspoon ground cinnamon

1 teaspoon salt
3/4 cup butter milk
2 eggs, beaten 1 teaspoon vanilla extract
2 tablespoons melted butter

Directions
Preheat oven to 325 degrees F (165 degrees C). Lightly grease a doughnut pan. In a large bowl, mix flour, sugar, baking powder, nutmeg, cinnamon and salt. Stir in butter milk, eggs, vanilla and butter. Beat together until well blended. Spray pan with cooking spray (I used the butter flavor). Fill each doughnut cup approximately 3/4 full. (Tip: fill a zip loc bag and cut the corner for easy filling.) Bake 8 to 10 minutes in the preheated oven, until doughnuts spring back when touched. Allow to cool slightly before removing from pan.


Almond-Orange Glaze
Recipe modified from All Recipes
Ingredients
1 cup confectioners' sugar
2 tablespoons hot water
1/4 teaspoon almond extract
1/4 teaspoon orange extract

To make glaze, blend confectioners' sugar, hot water, almond and orange extract in a small bowl. Dip doughnuts in the glaze and let set for a few minutes. (I decorated them with edible gold star glitter from Wilton)

Chocolate Glaze
Recipe from Alton Brown
Ingredients
1/2 cup unsalted butter
1/4 cup whole milk, warmed 1 tablespoon light corn syrup
2 teaspoons vanilla extract
4 ounces bittersweet chocolate, chopped
2 cups confectioners' sugar, sifted

DirectionsCombine butter, milk, corn syrup, and vanilla in medium saucepan and heat over medium heat until butter is melted. Decrease the heat to low, add the chocolate, and whisk until melted. Turn off heat, add the powdered sugar, and whisk until smooth. Place the mixture over a bowl of warm water and dip the doughnuts immediately. (I decorated them with sprinkles, mini chocolate chips and toasted coconut). Allow glaze to set for 30 minutes before serving. (For some reason my glaze never set :( But it still tasted good.)

And on that note....

Happy 2011

Wow 2010 flew by... I can't believe its 2011. Did you know this year will be my 10 year high school reunion! That'll make ya feel old ;-) Well, I rang in new years eve with my BF and a few friends. My one friend opened up his house for the party and let me put together the whole menu of food and desserts! (Is it sad I was most excited about that? Could care less about the ball dropping lol). I used Love the Day's NYE printables - which everyone loved! Here's a little taste of the party I put together....

Appetizers

Beef Sliders
Served with choice of condiments and sweet potato chips or salt and pepper chips

Sundried Tomato Bruschettas
Sundried tomato pesto with fresh mozzarella and prosciutto served on French bread

Hummus
Served with mini pitas and veggies

Candied Bacon
Brown sugar candied bacon with a touch of spice and served on a stick

Baked Brie
Brie baked in a pastry with apricot and cranberry

Bacon Wrapped Shrimp
Shrimp baked with bacon

Curry Chicken Skewers
Chicken marinated in a red curry peanut sauce and grilled

Desserts

Chocolate Salted Caramel Cupcakes
Chocolate cake filled with salted caramel sauce and topped with vanilla swiss meringue buttercream

Chocolate Dipped Strawberries
Topped with white chocolate, chocolate chips or toasted coconut

Homemade Doughnuts
Baked doughnuts topped with chocolate glaze or almond-orange glaze

Chocolate Dipped Oreo Pops
White or milk chocolate covered oreos on a stick

Chocolate Covered Marshmallows
Homemade marshmallows dipped in dark chocolate and topped with toasted coconut, graham cracker crumbs or sprinkles

I was very happy with the result and it all came together just as I envisioned. Thanks again to Love the Day for the printables! Cheers to a new year ~Cara Lee

Wednesday, December 29, 2010

Getting Ready for New Years Eve

I'm so excited I have NYE off for once. I've been working in a restaurant throughout college/grad school and I always miss the ball drop. Not doing anything crazy but I am excited to be putting together the hors dourves and desserts for the little get together we are planning with friends. I'm also using Love the Day's free printable for decor and inspiration for the food table. BTW - the printables are being offered on behalf of Operation Shower. Check them out if you get a chance :)

Soooo, today I prepped
some of the desserts for NYE...

Chocolate Covered Strawberries
Some sprinkled with toasted coconut, chocolate chips or drizzled with white chocolate

Chocolate Covered Oreo Pops
Decorated with edible star glitter and a little edible gold dust

Homemade Marshmallows

Now, I have been wanting to make my own marshmallows for a long time! I got the big box of Knox Gelatin (kinda expensive) and it has just been sitting there for a few months now. So finally I made them. I read good things about Martha Stewart's recipe so I gave it a try. I can officially confirm that once you have had a homemade marshmallow, ya can't go back to store bought!

Homemade Marshmallows
Recipe courtesy of Martha Stewart
Makes about 16


Ingredients
  • Nonstick cooking spray
  • 3 (1/4-ounce) packages unflavored gelatin
  • 1/2 cup cold water
  • 2 cups granulated sugar
  • 2/3 cup light corn syrup
  • 1/4 teaspoon coarse salt
  • 1/4 teaspoon pure peppermint extract (I did vanilla extract instead)
  • Confectioners' sugar, sifted, for coating
Directions

1. Lightly spray a 9-by-9-inch baking pan with cooking spray. Line pan with plastic wrap, leaving a 2-inch overhang on all sides; set aside. (This confused me a bit, I think I was supposed to put the plastic THEN spray)
2. In the bowl of an electric mixer fitted with the whisk attachment, sprinkle gelatin over 1/2 cup cold water; let stand for 10 minutes. In a medium saucepan, combine sugar, corn syrup, and 1/4 cup water. Place saucepan over medium-high heat and bring to a boil; boil rapidly for 1 minute. Remove from heat, and, with the mixer on high, slowly pour the boiling syrup down the side of the mixer bowl into gelatin mixture. Add salt and continue mixing for 12 minutes.
3. Add peppermint extract and mix until well combined. Spray a rubber spatula or your hands with cooking spray. Spread gelatin mixture evenly into pan using prepared spatula or your hands. Spray a sheet of plastic wrap with cooking spray and place, spray side down, on top of marshmallows. Let stand for 2 hours.
4. Carefully remove marshmallows from pan. Remove all plastic wrap and discard. Cut marshmallows into 2-inch squares using a sprayed a sharp knife. Place confectioners' sugar in a large bowl. Working in batches, add marshmallows to bowl and toss to coat. Marshmallows can be stored in an airtight container up to 3 days.


These are SO good! They also last longer in hot chocolate than store bought marshmallows and that makes me happy ;-) I did take a little of the batter and added some matcha powder to make a small batch of green tea marshmallows and they were very good too. I plan to experiment with other flavors in the future.

I have a few more desserts I plan to make and hopefully the rest of the food will turn out okay too ;-) Hope you all have a wonderful New Year's Eve! ~Cara Lee

Friday, December 24, 2010

Merry Christmas


Christmas season just makes me want to bake stuff whenever I have time. I whipped up these gingerbread cupcakes for fun today. I must say I am impressed with the recipe I found. I was also impressed with the $1.50 stand I found at the thrift store this week ;-) But back to the cupcakes, they cooked up beautifully with a few modifications I read in the reviews.
Gingerbread Cupcakes
Makes approximately 1 dozen
cupcakes
Recipe modified from the Food Network


Ingredients
  • 1/2 cup canola oil
  • 1/2 cup sugar
  • 1/2 cup unsulphured molasses
  • 1 large egg, at room temperature, lightly beaten with a fork
  • 1/4 teaspoon orange extract
  • 1/4 teaspoon lemon extract
  • 1 1/2 cups unbleached all-purpose flour
  • 1/2 tablespoon ground ginger
  • 1 teaspoons ground cinnamon
  • 1/2 teaspoon fine salt
  • 1/8 teaspoon ground cloves
  • 1/2 cup water
  • 1/2 tablespoon baking soda
  • 1 1/2 teaspoons baking powder
Directions

Preheat the oven to 325 degrees F.

In a large bowl, whisk together the oil, sugar, molasses. Add the eggs and whisk until smooth. Add orange and lemon extract.

In another large bowl, whisk together the flour, ground ginger, cinnamon, salt, and cloves. Whisk the molasses mixture into the flour mixture until evenly combined.

In a small saucepan, bring the water to a boil. Remove from the heat and stir in the baking soda and baking powder. Whisk the hot water into the batter until just combined. Transfer the batter into the prepared cupcake liners. Bake at 325 for about 18-22 minutes. After they have cooled top them off with cream cheese frosting (I added a little lemon juice to my cream cheese frosting for a little kick). Garnish with crystallized ginger and enjoy!

So yummy and very moist. It's not a very strong gingery cupcake which I actually prefer. I think this would be good any time of year - not just the holidays.

Merry Christmas! May your holiday be restful... just like my dog Rocco!

~Cara Lee

Tuesday, December 21, 2010

Happy Winter!

Today is the first day of winter! Did anyone see the winter eclipse? I decided to sleep. I'm really not a winter person - I hate being cold! But sad I'm missing the eclipse. In honor of the first day of winter here are some wintery red velvet cupcakes I made for an order this weekend....


Hope you all are getting that shopping done for the holidays :)

Sunday, December 12, 2010

Holiday Party


This weekend my BF and I headed down to Chesapeake, VA to see his cousin's Christmas light display (I kind of refer to his cousin as the Clark Griswold of Chesapeake, VA - see video I posted ;-). We also went down to attend his and his wife's holiday party. I decided to contribute some sweets since you really can never have enough during the holidays.


So for the party I made a cake and some cake pops. This was my second attempt at Bakerella's cake pop creation. Flavors: red velvet, chocolate and chocolate peppermint. As for decor, I stuck to basic sprinkles. They took forever to make but I was happy with the result overall - much better than before.
For the cake I had this really cute basic winter wonderland idea in my head. But it did not execute as nice as I wanted. I brought all my materials to their house and assembled and decorated there, but I still felt out of my element I guess. Not to mention I had a huge gaping hole in the fondant and had to patch it up. It was so frustrating. I just wanted to pay tribute to his cousin's Christmas lights and winter. This is what I ended up with.... not my fave cake, but it was presentable. Most important: the cake tasted good and was moist ;-) Flavors were: vanilla almond cake with vanilla SMBC and chocolate ganache as well as red velvet with cream cheese frosting. Hope everyone is having a happy holiday season... can't believe how fast the month is flying by!

Tuesday, December 7, 2010

Smores Cupcakes


A few weeks ago I won a giveaway from The Pink Little Cake. Kathia at PLC was giving away a whole bunch of Naturally Nora mixes. And I actually won! I decided to finally use one of the mixes to create a cupcake for my last night of class for the fall semester.

My Winnings!

Well, I love smores - even when I'm not camping. There are hundreds of ways of putting it into cupcake form. I decided to use the Naturally Nora Double Fudgey box brownie mix and this is what I came up with for my semi-homemade smores cupcake.

1) Make your favorite box brownie mix (the Naturally Nora is wonderful! Taste like the box mix brownies I grew up, and is all natural.)
2) Make a graham cracker crust to put at the bottom of the cupcake liners (Tip: use a small flat glass bottom to push down the graham cracker crust to make it n
ice and flat).

3) I baked them at 350 for about 18 minutes, checked them and they needed a few more. WIll depend on your oven. Let them cool completely.

4) I made marshmallow frosting that was featured on Martha Stewart's website, which is from Trophy Cupcakes in Seattle (I've actually been there!).
Check out those stiff peaks!

5) Frost the cupcakes and torch them! Unfortunately I do not own a torch :( So I did the broiler method. Kinda tricky, you have to watch it very closely. I probably could have caught my hand on fire at one point when I was trying to get them near the flame lol :-/


6) Enjoy :)
Thank you Kathia and Naturally Nora for hosting the giveaway! Can't wait to try the other mixes :) Now I am going to celebrate the fall semester being over!!

Wednesday, December 1, 2010

Holidays are in full effect


Well it's December 1st, and the holidays are in full effect. Hanukkah starts today and only 25 more days until Christmas! I have yet to shop for anyone (sorry guys! lol). As my grad classes are winding down for the semester I decided to make some cupcakes for one of my classes that is ending today (any excuse to try a new recipe creation).

I decided to make cran-orange cupcakes. I made some last year, which were pretty good. But I wanted to tweak the recipe a bit. For the cake, I made a yellow cupcake batter and added fresh orange zest. Then I cooked the cranberries first with water and sugar (like you would cranberry sauce) but left them whole and drained the excess juice when cooled. The cranberries are then folded gently into the batter. For the frosting, I'm hooked on the SMBC (swiss meringue buttercream)! The cream cheese frosting I did last year was good, but can be so sweet with an already sweet cupcake. So I did a white chocolate SMBC. To top it all off they are garnished with sugared cranberries and a fondant holly leaf.

Very happy with my result this year. Hopefully my classmates will enjoy them too :) Happy Holidays!